Last updated 27/1/25
Primary Survey - Breathing
Once all immediately life-threatening airway conditions have been identified and treated as best as possible, the assessment of the casualty can move on to B - breathing.
Check for Breathing
Look to see if the casualty is making attempts to breathe. Place your ear/cheek near to the casualty’s nose/mouth. Listen and feel for breathing, watch for the chest rising and falling, or place a hand on tummy to feel for diaphragm movement. It is not sufficient just to observe breathing movements without confirming that air is going in and out because this can occur even in the presence of total airway obstruction i.e. the casualty is trying to breathe but is prevented by total airway obstruction.
Check for 10 seconds to establish if the casualty is breathing or 30 seconds to count breaths per minute (respiratory rate).
No Breathing
If there is no sign of breathing, assume a cardiac arrest has occurred. Start CPR and attach the AED immediately, if available (see cardiac arrest and resuscitation for further details) before starting chest compressions. This is because the earlier defibrillation is attempted, the more successful it is likely to be.
Do not spend time trying to find a pulse unless you do it regularly. Many practitioners struggle to do this, even on a normal person. In someone who has had a cardiac arrest, trying to find a pulse just delays starting chest compressions and most importantly, applying the AED.
Breathing
Normal healthy adults at rest breathe at a rate of 12 – 20 breaths per minute.
The normal respiratory rate is faster in children. Small children and infants in particular can have a healthy respiratory rate which would be considered very abnormal in adults. The ‘Interpretation of Vital Signs’ card in the Cas Card folder and our Cas Care book page 16, give you a good guide to the acceptable, concerning & serious values for adults and children.
Assisting Breathing
Casualty with a slow respiratory rate
If the respiratory rate is slow (≤8 breaths per minute) and you are sure that the airway is clear (very important), use the bag-valve-mask (BVM) or bag-valve and i-gel to assist breathing.
When assisting a casualty who is already breathing, watch for chest rise and fall and gently push a bit more (oxygenated) air in with each of their in-breaths. Squeeze the bag gently so that the breath is delivered smoothly over about 1-1.5 seconds in an adult. Then release your grip on the bag so that the casualty can exhale without encountering any resistance.
It’s essential not to squeeze the bag too hard as this can cause problems. It’s easy to inadvertently inflate the stomach with air, thereby increasing the risk of regurgitation of stomach contents. Another risk of squeezing too hard (or too fast) is hyperventilation, which is always a bad thing.
Note: Supplementing each breath is far easier than trying to squeeze in additional breaths between each of their breaths. In addition, if you get the timing wrong, there is a potential risk for lung damage or giving them an ineffective breath if you try to inflate the lungs as they are breathing out.
The casualty with a rapid respiratory rate
Rates ≥30/minute indicate significant illness. At that speed, breaths tend to shallower than normal. It is very hard to assist breathing on someone who is breathing fast because it is hard to time the manual in-breath with the casualty’s own in-breath. For example, at 30/min, each breath is 2 seconds (1 second in, 1 second out), so you have <1 second to get the breath into the lungs. It is therefore only realistic to expect to be able to assist breathing when the rate is slow.
The casualty who is not breathing
If there is no sign of breathing but there is a palpable pulse (e.g. lightning strike), for an adult, it is sufficient to provide one breath every 5 seconds or so (12 breaths/minute). For small children, the rate should be increased to one breath every 3-4 seconds (15-20 breaths/minute). But never hyperventilate anyone i.e. breathe too quickly and/or with deep breaths.
If the casualty is not breathing and has no pulse i.e. cardiac arrest, breathe as in BLS protocol. This means BVM or Bag-valve-i-gel two quick breaths after every 30 chest compressions.
Adult Bag-Valve-Mask Techniques
Face mask or bag-valve-mask (BVM) ventilation is an essential skill for airway management in MR. It can be a difficult skill to perform correctly. You need:
Proper position of the head and neck. This is with the head and neck in a neutral position, and definitely not with the chin on the chest.
Manually opening the airway with a jaw thrust/head tilt & chin lift can help.
Placing a nasopharyngeal or (better) an oropharyngeal airway device,
Aim to achieve a tight seal between the face mask and the face.
Hand position
Research shows that a two-handed technique is the most effective, particularly in the hands of people who are not familiar with the technique. This is shown below.
If you’re on your own or there are there are too few team members on scene to spare a second person to assist, use a one handed ‘C-E’ technique.
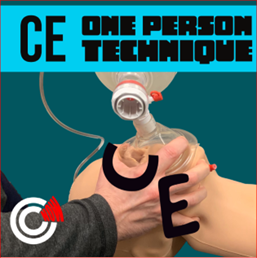
One-person
Using the “C-E” technique.
But as soon as enough team members arrive use the two handed technique, as shown below.

Holding facemask with two hands
The two-handed “C-E” technique.
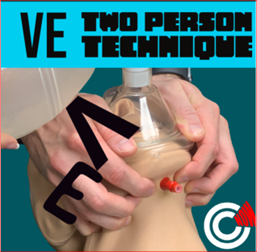
Alternative two-hands technique
Using “V-E” technique for holding facemask
In the two-handed two-person bag-valve mask (BVM) technique, one person maintains a mask seal with both hands ensuring a proper seal and airway opening, while another person squeezes the bag to deliver breaths.

Two-person BVM
One person holds the facemask, the second person squeezes the bag (Note: squeeze with one hand to avoid inadvertent hyperventilation)
In the one-handed bag-valve mask (BVM) technique, one person maintains a mask seal with one hand, whilst squeezing the bag with the other hand. Achieving a proper seal and airway opening is more difficult.
This video demonstrates the one handed ‘C-E’ technique for holding the face mask for single operator.
If the chest fails to rise and fall with assisted breaths, there are a number of possible causes. The commonest are that the face mask is not making a good seal around the face, and needs to be re-positioned, or that the tongue has fallen back and is causing an obstruction. In the former, use a two-person technique with one person focusing on holding the mask in place to get a good seal whilst the other is squeezing the bag (shown below). If the tongue could be a problem, insert a correctly-sized OPA. Other less common causes of failure to deliver breaths through a face mask are airway obstruction e.g. due to vomit and severe asthma.
Children’s Bag-Valve-Mask Technique
Bag-Valve technique with the i-gel

i-gel in place. Extension tubing has been connected from the i-gel to the Bag Valve to allow for greater flexibility . Oxygen is connected to the bag. Manually squeeze the bag about 10-12/min. i.e 1 : 5secs
Listen for Breathing Sounds and Respiratory Distress
Although it isn’t something you should spend time specifically trying to work out during the Primary Survey, whilst you are assessing the respiratory rate and checking the chest provides a good opportunity to listen for abnormal breathing sounds and note signs of respiratory distress, if you happen to notice them whilst doing your assessment. The following video shows a child in respiratory distress:
Some people in respiratory distress will make a sound call stridor. This is a high-pitched sound which results from a narrowed or obstructed airway.
Chest Assessment
Having established that breathing is taking place at an acceptable rate, observe the casualty to see if the breathing pattern and chest look normal. An example of an abnormal pattern would be shallow breaths or unequal movement of the two sides of the chest. When respiratory distress is severe, the person may use muscles in the neck and shoulders to help them breathe. These muscles are referred to as “accessory muscles” because they are not needed for normal breathing and only come into play when breathing is difficult.
Access below clothing to skin is necessary to fully assess the chest. Explain the need to the casualty and obtain consent.
Check for signs of injuries around the neck and chest. The simplest way to remember how to do this is to start at the chin and work your way down to the bottom of the ribs, making sure that you look at everything.
THOROUGH ASSESSMENT OF THE CHEST FOR LIFE-THREATENING INJURY
Examine from the Adam's Apple (larynx) to bottom of rib cage for abnormalities. If the casualty is conscious, ask them how their breathing is.
Important things to examine are:
i) Observe breathing pattern before even touching the casualty:
Struggling to breathe or relaxed? Does it sound normal?
Can they speak full sentences?
ii) Neck the Larynx (any trauma?) and Trachea (is it central? see photo below). Are the neck veins bulging? see photo below.
iii) Look at the chest wall (front, back, sides including armpits) for:
are both sides of the chest moving equally?
uneven shape; bruising; lacerations; holes; flail segment (produces asymmetrical movement of chest wall during breathing).
iv) Feel the chest for:
tenderness
Surgical Emphysema (air in tissues, feels crackly to gentle pressure)
deformity due to a fractured rib or collar bone
If a problem is encountered, treat appropriately
HIGH FLOW OXYGEN (if appropriate)
15L per minute (unless supplies are low). Non-rebreathing mask with reservoir bag. Make sure reservoir bag is full before using on the casualty.
Checking for tracheal deviation - a late sign in Tension Pneumothorax
Managing chest injuries
Chest injuries are relatively rare in mountain rescue, but globally, they are the third leading cause of trauma death after head and spinal cord injuries. This section focuses on traumatic chest injuries, but remember that there are other causes of chest pain to consider, e.g. heart attack. Chest injury can be either blunt or penetrating, and encompasses injuries to the chest wall (cuts, bruising and rib fractures), lung injury, and issues involving the pleural space (pneumothorax and haemothorax).
Terminology
Pneumothorax is air in the space between the rib cage and the outer surface of the lung
Haemothorax is blood in the same place
Assessment
Symptoms of chest injury are
Pain on breathing
Difficulty in breathing (hard to get air in and out)
Shortness of breath
Clinical signs to look for are:
Respiratory distress (increased breathing rate; increased effort of breathing; abnormal breathing pattern; etc.)
Cyanosis - a blue discoloration of the lips, indicating higher-than-normal levels of deoxygenated blood
Uneven chest movement
Fast heart rate
Pneumothorax
In MR, pneumothorax is most likely to occur following chest trauma. However, it can also occur spontaneously, when it is particularly likely to affect tall, thin, athletic young men of Northern European descent. There are two types of pneumothorax: closed and open. This refers to whether or not there is a hole in the chest wall that has allowed external air into the space between the rib cage and the outer surface of the lung.
Closed pneumothorax
This is when a pneumothorax occurs and the chest wall is intact. The commonest cause in MR is a fractured rib puncturing the lung, so that air that had been confined to inside the lung is able to escape into the space between the rib cage and the outer surface of the lung (see picture on the right). As the casualty breathes in, some air goes from inside the damaged lung into the air space outside the lung. On exhalation, the air goes out again. On its own, a closed pneumothorax is not a life-threatening condition, but it will cause chest pain and breathlessness.
Tension pneumothorax
In this situation, the air that has accumulated in the closed pneumothorax becomes under pressure. This occurs because when the casualty breathes in, some air goes from inside the damaged lung into the air space outside the lung, as above, but when they breathe out, that additional air stays in the space between the lung surface and the rib cage. As a result, the amount of air in the space increases, breath by breath. As breathing continues, more air is pumped into the space by the mechanism of breathing, and this puts the whole lot under increasing pressure. The pressure eventually gets so high that it completely squashes the underlying lung, which therefore cannot participate in gas exchange, and additionally, it compresses the heart and the other lung, as shown in the diagram. Because the heart is pushed over towards the other side of the chest, it drags the windpipe (trachea) with it, which explains why we look for a deviated trachea when examing the chest, as described above.
The big thing about a tension pneumothorax is that it WILL become a life threat if untreated, resulting in cardiac arrest.
The clinical signs are summarised in the diagram on the right. The effects are listed below. Items underlined are very common in these cases:
Chest pain
Respiratory distress
Shortness of breath. Fast breathing rate.
The SpO2 will fall regardless of how much oxygen is given
Fast heart rate (really high - perhaps 140/min) as the heart tries to compensate
Although a late sign, the blood pressure will eventually fall, not only because the heart becomes compressed, but the high pressure in the chest impedes blood from returning to the heart
Tracheal deviation and distended neck veins are also late signs.
Tension pneumothorax is a reversible cause of cardiac arrest
Open pneumothorax
This is the same principle as the closed pneumothorax described above, but instead of the air getting into the space between the rib cage and the outer surface of the lung from inside the lung, it gets there from a hole in the chest wall. In MR, it is most likely to result from a tree branch, ice axe or walking pole sticking into the chest. Another term for this injury is “sucking chest wound”, because air can flow freely in and out through the hole. Bleeding is always present from the injured chest wall, and this creates a bubbling effect as the air moves through the hole. An example is shown in the photo on the right and in the video. The video shows the application of the Russell Chest Seal that we use for this trauma. The company video with more explanation is shown below.
The effect of an open pneumothorax is depicted in the lower right picture.
An open pneumothorax will not develop tension UNLESS the hole in the chest wall becomes blocked and the underlying lung is also damaged. When the hole is blocked, it behaves as though the chest wall is intact. If lung damage is also present, then tension can develop just as it can in the case of a closed pneumothorax described above.
Management of an open pneumothorax
Place a special chest seal over the hole. We currently use the ‘Russell’ chest seal. This is explained in more detail in the company video below. This device has a one-way valve that allows air inside the chest to escape as the casualty breathes, but no air to re-enter. As a result, the underlying lung, which has collapsed, gradually re-expands, and the casualty’s breathing and oxygenation will improve.
NB Even though a chest seal has been attached, if the hole in the chest wall becomes blocked, tension will develop. Therefore, monitor all casualties with a sucking chest wound for deterioration.


R sided tension pneumothorax

Clinical signs of a tension pneumothorax

Open pneumothorax (also called Sucking chest wound)

Open pneumothorax
Note: If a chest seal is not available, the best current advice from the Faculty of Prehospital Care is to completely cover the hole with a thin, dry, adherent dressing or four-sided dressing. Whilst covering the hole will undoubtedly improve things initially, because the underlying lung will start to re-expand from its collapsed state, it is also possible that tension will develop, as it could if the valve in a Russell seal becomes blocked (see above). Although rare, if this happens, quickly remove the dressing and make sure that air can get freely in and out of the hole in the chest wall (if necessary, carefully poke the tip of a gloved finger into it). Do not allow the casualty to lie on the wound.
Flail chest
A flail chest or flail segment occurs when there are two or more breaks in three or more adjacent ribs. Flail chest could be a life threatening condition. A segment of the rib cage breaks and becomes separated or detached from the chest wall. It usually requires significant violent force in order to break the ribs in this way.
The fractured segment will sink with inspiration and expand with expiration, opposite to normal chest wall mechanics i.e. working in the opposite direction to the rest of the chest wall - this is called ‘paradoxical breathing’.
Symptoms:
chest pain (constant movement of broken ribs)
shortness of breath
paradoxical movement of chest wall
broken ends may puncture the lung and cause a pneumothorax
Additional general points in the management of chest injuries
The chest contains many highly vascular organs which can bleed profusely. Haemorrhagic shock is very common in chest injury.
Treat any chest injury that could be impairing breathing.
Drug use in the presence of chest injury
Entonox is contraindicated in ALL chest injuries, especially pneumothorax. This is because it can lead to a pneumothorax developing tension. Penthrox, an anaesthetic gas, will be introduced with training this year and can be given to a casualty with a chest injury.
Good analgesia can significantly improve the quality of breathing. Paracetamol and Ibuprofen may help, but they are usually not strong enough on their own to provide sufficient analgesia. Therefore, an opioid is desirable. Remember that all opioids can cause respiratory depression so should ideally only be given after consultation with a doctor. If it is felt best to initially minimise how much opioid is used, consider a half dose of morphine (5 mg) or a fentanyl lozenge.
Administer oxygen via a non-rebreathing mask in all chest injuries. Use high flow rate unless supplies are limited.
Fractured ribs and flail segments
Pad the injured side.
Urgent evacuation is always warranted in all casualties with chest injury
Using Oxygen
- If a reliable SpO2 reading is ≥94%, then no supplemental oxygen is required. <94%, short of breath, cold, shivering or not sure the diagnosis is MI, then oxygen at 15 L/min
- NB this guidance applies to MI and stroke. In all other situtations when oxygen could be required e.g. haemorrhagic shock, anaphylaxis, etc., give it as normal
General indications for giving oxygen in MR during the Primary Survey are:
Breathlessness from any cause
Impaired breathing mechanics e.g. chest injury, asthma
Serious illness or injury
Abnormal vital signs
Reduced conscious level
Severe hypothermia
Patient shivering and also has a heart or chest problem
IF IN DOUBT, IT IS SAFE TO ADMINISTER OXYGEN IN ALL CONDITIONS
If you have a large supply of oxygen, start with a high flow rate, which is 15 l/min, using a non-rebreathing mask with reservoir bag. Ensure the reservoir bag is fully inflated by placing a gloved finger over the nozzle as it inflates prior to placing the mask on the casualty’s face.
However, if supplies are limited, it is wise to be cautious. For example, the small one litre cylinders only contain 300 litres of oxygen. At 15 l/min, this will only last 20 minutes. If the cylinder could run out before a replacement is available, then turn the flow down e.g. to 6 l/min. It is better for the casualty to receive a low flow of extra oxygen continuously than a lot for 20 minutes and then just air.
How to set up the oxygen
Guide to common causes of raised respiratory rates
Not all breathing problems result from chest injuries so consider other causes.
|
Raised respiratory rate in casualty with intact chest |
||
|
Respiratory pattern |
Typical causes |
Features |
|
Short inspiration, prolonged expiration |
Asthma or anaphylaxis |
Uses accessory muscles (upper arms and neck) |
|
Equal inspiration/expiration with extra noise (sometimes loud) |
Partial obstruction in upper airway e.g. stridor, laryngeal spasm, swelling or foreign body |
Uses accessory muscles (upper arms and neck). Face may be engorged if breathing out against resistance. |
|
Panting breathing. |
Shock |
Air hunger, anxious, cold skin, sweaty and white. |
|
Hyperventilation |
Anxiety/pain |
Casualty distressed and breathing hard. |