Updated 15.3.26
GENERAL PRINCIPLES
Terminology
A fracture is a break in any part of a bone. It may be visible from the outside, such as the fractured L clavicle in the photo below (left).
A dislocation occurs at a joint i.e. where two bones meet. When dislocated, the joint comes out of alignment. Because most joints are visible, a dislocation is often immediately obvious just from looking at it. An example is the L shoulder in the photo below on the right.

Fractured left clavicle

Dislocated left shoulder
Fracture types
Closed - no broken skin
Open - skin broken; bone ends may be visible; risk of infection and increased blood loss, which might be visible in ‘C’ of the primary survey when you do “One on the floor and four more”.
Upper limb fractures: Clavicle, Humerus and Wrist (Radius & Ulna)
Lower limb fractures: Knee (dislocation), Tibia/Fibula
Major fractures: Pelvis, Femur: shaft of Femur and neck of Femur
The whole topic of fractures & dislocations is covered quite comprehensively in Casualty Care Revision in MR. What this website adds is photographs, videos, and more lengthy explanations, where that could be helpful. Have a look at the Medical Feedback Reports as these give you a nice run through actual rescues and casualty care given.
Introduction
Suspected fractures are the most common injury encountered in mountain rescue, accounting for over half of all call-outs. Most of these are lower limb injuries and affect the leg below the knee. Fractures can range in severity from minor injuries to life-threatening emergencies, such as femoral or pelvic fractures. This page covers the general principles for assessing and managing fractures.
Bones provide a scaffold to support and protect soft tissue and organs, and as points of attachment for the muscles that allow movement at joints. Whilst a fracture only involves the bony part of an injury, there will almost always be associated soft tissue injury. Additional secondary injury to soft tissues can be caused by the fracture itself of the bone ends, which are sharp and jagged, can stick into soft tissue and damage it if the bone is moved. Minimising secondary soft tissue injury by careful handling, splinting and reduction is therefore an essential element of managing suspected fractures.
No matter how painful or dramatic in appearance an injury maybe, never let a limb fracture distract from less obvious, but life-threatening, problems. Always exclude life-threatening injuries using the primary survey before assessing and treating fractures, other than pelvic and mid shaft femoral fractures, which will be identified and treated during the primary survey in ‘C’ (one on the floor and four more).
Principles of management
There are four stages in the management of fractures and dislocations:
History. This may also give an indication of how much damage has already occurred
Examine the area carefully to see if there is a risk of complications arising. If so, work out how to prevent or minimise those. This could require an intervention such as realigning part of a limb e.g. the foot in a bad ankle fracture
Splinting to stabilise and protect the area. This also relieves some of the pain.
Drugs - analgesia and possibly also antibiotics if an open fracture.
History
Try to gain as many details about the mechanism of injury as possible. If a witness was present, ask how they would describe it. Things to consider are:
How it happened and where
Tripped
Foot caught in a hole or between stones and then fell
Fell vertically and landed e.g. on the feet or an outstretched arm
Crushed by a rock
Where they fell (they've often tried to move afterwards) and what they landed on (grass, rock, mud.....)
If it appeared to be caused by a trip, confirm that it was so and not that the casualty had transiently lost consciousness.
As they were falling
How they fell (forwards or backwards)?
Did the limbs twist or rotate as they fell/hit the ground
The landing
How they landed (which parts of the body made contact with the ground, which hit first, which took the main impact)
Did they tumble or role afterwards?
The effect on the bone(s) and joints
Audible crack? Feel anything snapping? If so, this is a strong indicator that a bone has fractured.
Did the area appear abnormally-shaped? For example, in an ankle injury, ask if the foot was pointing the wrong way. If so, this indicates a serious type of fracture that could jeopardise the viability of the leg if not managed correctly.
Ask about loss of function. Does the limb work as it should? In the case of leg injuries have they been able to weight-bear or walk since the injury occurred (do not ask them to attempt to place weight on the injured leg).
Have they experienced crepitus, a crunching sensation as the bone ends rub against each other when they move? Warning - Do not ask them to move again to see if it is present.
Associated things
Any associated trauma e.g. hit their head in the fall, or damaged their wrist if they put their arm out to break the fall.
Have they tried to move themselves since the incident?
Remember - there may be more than one thing going on. Always check for something which may have precipitated the fall such as low blood sugar, blackout, stroke or seizure. This very thing happened to a casualty we were called to in Stickle Ghyll. She had a seizure, and that caused her to fall.
Examination of the injury
This focuses on ankle fractures, as that’s the commonest fracture we see, but the principles apply to all fractures.
Identifying the fracture site can usually be done visually, and is easy in instances of obvious deformity. However, it can be more difficult if swelling is present. Ask the casualty to identify the suspected fracture site. Apply gentle pressure once to help locate the fracture site. Sometimes, tapping with your finger tip over the suspected area will be sufficient to pinpoint the likely fracture site.
Fully expose the suspected fracture site to assess it. Be careful to avoid unnecessary pain and movement. If necessary, cut away clothing rather than attempt to take it off.
Remember - in limb fractures, you can use the other limb for comparison if it's uninjured.
Look for
Deformity
Check along length of the bone and joint for visible angulation or shortening of the limb
Compare with other limb
Remember - deformity can be disguised by surrounding soft tissue swelling.
Swelling and/or bruising present over the fracture.
Loss of function i.e. doesn’t work as it should. In a leg, this will be accompanied by an inability to weight bear
Open or closed fracture
Open fractures are usually the most serious fractures, not only on the hill but also because the outcome for the casualty may not be as good.
Skin tenting
NB this is limb threatening. Do NOT ignore it.
Fractured bone presses on the skin from the inside
This compromises skin blood supply so the skin will look pale
If untreated, the bone can puncture the skin resulting in an open fracture. This is very serious and merits urgent evacuation
Skin tenting is an indication for attempting manipulation on the hill to restore normal alignment.
Pain
Location of the most painful area(s)
Motor, Circulation & Sensation (MCS)
Assess MCS in the distal limb and note any abnormalities:
Motor function i.e. ability to move. Test for movement e.g. fingers or toes.
Circulation - Is there a foot pulse? prolonged capillary refill time? poor skin colour and cool skin temperature?
Sensation - apply a light touch, can they feel it? Does it feel normal to them (if in doubt, compare with the normal side). Any pins and needles?
Remember - Distal MCS should be assessed before and after any interventions e.g. splinting or packaging and periodically during the evacuation.
Check that the other major bones and joints are intact by asking the casualty to move each limb in turn and report any pain or discomfort.

Ow!!!

Fractured ankle causing obvious deformity

Ankle fracture with swelling over the fracture site

Open ankle fracture
Sorry this is a bit gory, but that’s what they look like. Notice the amount of blood loss and that the foot is also in the wrong position, indicating that the ankle joint is also dislocated

Skin tenting
The fracture is pushing on the skin and if left like that, will eventually push through
The following are a warning that the limb is at risk, and needs urgent treatment and evacuation:
- Broken skin/open fracture
- Skin tenting
- Nerve damage: pins and needles or weakness
- Loss of blood supply : no pulse, or the capillary refill is very prolonged or absent. The skin will usually be very pale/discoloured and cold.
- Part of the limb is 'pointing the wrong way' and it cannot be returned to the normal anatomical position
Open Fractures
An open fracture is where a broken bone has penetrated the skin. The bone does not need to be sticking out or visible for a fracture to be considered ‘open’. The broken skin might have re-covered the injury site which can make the puncture site difficult to see. If you see broken skin above a suspected fracture site, you should assume and act as if the injury is ‘open’. Do not put any foreign object e.g. a finger into a wounds to see if there is bone there.
It's important to recognise and draw the distinction between closed and open fractures because when a broken bone penetrates the skin, there is an increased risk of bleeding and infection. There can also be increased pain and need for immediate treatment.
Definitive management will be carried out in hospital. However, it is permissible to gently wash away any gross contamination from the wound with saline. You are not aiming to thoroughly clean the wound by flushing it out. This requires surgical equipment and doing so on the hill could push contamination further into the wound. Your aim is only to remove large contamination by gently washing it way.
Reduce the fracture if possible (see below).
Attempt to stem external bleeding by using direct pressure, packing (including with haemostatic gauze) and bandaging.
Cover wounds with dressings.
Splint the injured limb.
Make a note on the Cas card describing the matter that was contaminating the wound.
For contaminated wounds or open fracture, give an antibiotic (Co-Amoxiclav) if the time from the injury to admission to hospital will be greater than 1 hour. Do NOT give this drug to anyone who is allergic to penicillin. If you can’t get a clear allergy history, do not give the drug. It’s safer not to have given it than to be saddled with managing an adverse drug reaction, particularly on a mountain.
Watch for haemorrhagic shock developing. Open wounds exacerbate bleeding.
Reduction
Reduction is the term for restoring a fracture to anything approximating normal anatomical alignment.
Reduction should help reduce pain, bleeding, improve circulation to the distal limb thereby preventing ischaemia, and prevent tenting to avoid closed fractures becoming open. However, it is not without risk and this should be weighed against the risk of causing further damage by attempting to reduce a complicated fracture.
Reduction should only be considered if there are concerns over distal MCS or tenting, AND you have been trained how to undertake the procedure.
Ischaemia
This is pronounced isskeemeeah, and it’s the medical term meaning absence of blood supply. In fractures, this can happen in three ways:
Kinking of blood vessels due to a change in position of the broken bone
Direct pressure on a blood vessel by a bone
In the calf, a fracture of the upper tibia can bleed into the calf muscles and press on the blood vessels, thereby obstructing them. This is called compartment syndrome. This type of fracture is uncommon in our practice, but we did have one in Stickle Ghyll. Compartment syndrome takes 2-3 hours to develop, but it could happen if it takes us some time to reach a casualty with this type of injury. Compartment syndrome is extremely painful (could need 2-3 times the normal dose of morphine) and it threatens the viability of the leg so it needs very urgent treatment.
The P's can be used to help identify ischaemia.
Pain - out of proportion with the injury
Pulselessness - weak or no distal pulse, slow capillary refill time
Perishing cold - the limb is cold to the touch
Pallor - pale coloured skin
Pins & Needles i.e. change or loss of sensation
Paralysis - loss of movement
Pain
Casualties with fractures and dislocations are likely to be in considerable pain, although this is very variable. However, it is safe to say that some discomfort will be experienced at all times. Therefore, as a general rule, consider pain management as soon as practically possible i.e. after the primary survey (not during), when you have excluded any life threats. Examples of the range of pain:
It is not uncommon for a casualty with a fracture of a small bone e.g. ankle, to have experienced pain that they would score as 8-9/10 on the pain score when the injury first occurred, but once the ankle is left alone, the pain score falls to 2-3/10.
By contrast, large bones, such as the femur remain extremely painful at all times. This is partly a reflection of the size of the bone and the amount of force that was required to break it, but also because of the muscle tension that pulls on the two halves of the femur. In cases like this, splinting is particularly good in providing analgesia.
Dislocations are also extremely painful for two reasons: (1) stretching of the ligaments that normally hold the joint in position; (2) there may be an associated fracture of one of the bones e.g. in a shoulder dislocation, it is not uncommon to get an accompanying fracture of the upper humerus.
Pain emanates from the broken bone and the associated soft tissues. Muscles and ligaments can be damaged by the bone ends, or simply just stretched beyond their normal limits. Pain is particularly marked in displaced fractures i.e. the bone isn’t just broken, but the two ends are not lined up. A good example of this is fractured femur because the strong thigh muscles pull on the femur causing the two broken ends to overlap. There will be increased pain with any movement of the injured part. Reduction, which means returning the limb to it's normal anatomical alignment, is very effective in reducing pain.
Assessment of pain in fractures and dislocations
Ask the casualty to rate their pain using the Pain Score, on a scale of zero to ten, with zero being no pain at all, and ten being the worst pain imaginable. Ask them about it:
Now
At the time of the incident
How it's changed over time
If anything provokes an increase in pain e.g. movement or weight bearing.
The pain score should be repeated after interventions e.g. splinting or packaging and periodically during the evacuation. Repeating their previous score to them before asking for their current score improves accuracy, because they make a comparison in their mind. The trend in scores is a more important indicator of the effectiveness of treatment than the absolute score.
Remember - fractures can be very painful and distract from other more serious injuries. More than one thing may be going on, always check for other injuries and medical problems which could have caused the trauma such as stroke, hypoglycemia and seizures.
General Points For Treatment
Careful handling
Pain relief (see Pain Management section)
Antibiotics for open fractures or contaminated wounds if admission to hospital will be more than one hour since injury
Reduction
Splinting
Whilst open fractures are most likely to occur during the initial trauma, movement of the limb or sustained pressure on the skin in a closed fracture can cause an injury and become open at a later time. When dealing with a fracture, we should always be aware of the potential for a closed fracture to become an open fracture if there is tenting or excessive movement.
Treatment
By the time we arrive, casualties will have usually moved the injured limb into the most comfortable position for them.
If the distal limb (the part beyond the fracture site) has a good circulation and there is no skin tenting, it is appropriate to provide pain relief before reducing (if necessary) and/or splinting the limb as there will be no immediate risk from delaying our intervention until analgesia is established. This would be by using a range of analgesia - see the analgesic (pain relief) ladder in Pain Management.
However, standard analgesics (paracetamol, ibuprofen and opiates) take time to work. If you believe the limb is at immediate risk of a major complication e.g. the bone looks like it is about to pop through the skin, it would be better to use Entonox or Penthrox for manipulation procedures and then give any additional analgesia to support ongoing pain relief.
The amount of pain relief you administer should be given based on reported pain score.
Remember - evacuation can be long and bumpy, fractures are usually more painful when moved, especially if crepitus is present. Even with splinting, there may be an increase in pain and a need for additional analgesia during the evacuation.
Reduction of a fracture in a compromised limb
Reduction is the term for restoring a fracture to normal anatomical alignment. It does not imply any sort of removal or decrease, but rather implies a restoration back to normal. To reduce a badly aligned fracture, you have to manipulate some part of it.
Reducing a fracture has several important beneficial effects:
reduces pain, because a badly misaligned bone is painful simply because of the position it is in and the stretching of muscles and ligaments
reduces bleeding, because once the two cut ends of the bone are aligned, a blood clot can form
restores/improves circulation to the distal limb, because realignment means that blood vessels are no longer stretched or kinked, but lie in their normal position
prevents tenting of the skin from occurring, or takes the pressure off the skin in an already-tented area, to avoid a closed fracture becoming open.
However, manipulation it is not without risk, so potential benefits should be weighed against the risk of causing further damage by attempting to reduce a complicated fracture. If the benefit-risk analysis indicates that there is more to be gained than waiting, then you have to attempt it. An example would be a remote location, such as the end of Far Easedale; the cloud is down so there is no prospect of helimed support; it’s an ankle fracture, the foot is white and there is marked tenting of the skin meaning that the fracture could become open.
NB Under no circumstances should attempts be made to manipulate a dislocated shoulder. Aim to pad and secure in the most comfortable position for evacuation.
How to reduce an ankle fracture
The video below shows how to do it. Key points:
Fracture dislocation of the ankle i.e. the bones around the ankle are fractured, and the foot has subsequently come out of place.
The foot pulse is present, but the ankle is deformed and there is concern that the circulation may become compromised. Therefore, manipulation is needed. At this time, there is no obvious skin tenting, though the swelling can hide that to some extent.
They have checked for drug allergies, last ate, etc. (i.e. SAMPLE)
Monitoring (we would use SpO2). Someone should monitor the breathing and pulse rate of the casualty during the procedure.
Analgesia is administered before manipulating. Health care professionals can give morphine intravenously, it works more quickly than an intramuscular injection, and if appropriate Midazolam intravenously for sedation. This is not something that a Cas Carer can do, so non-healthcare professional team members should use Entonox or Penthrox for this purpose.
Notice that they check the patient’s blood pressure, pulse and pupils after giving the morphine, to check that they haven’t inadvertently overdosed her.

Ankle fracture dislocation

Holding the foot for manipulating the ankle.
A second person holds the leg just below the knee.
One person supports the lower leg just below the knee. This person might also have to apply counter-traction if the manipulation is difficult.
The person manipulating (operator) holds the heel with his R hand and the mid foot with his L hand.
He applies traction to the ankle i.e. pulls the foot downwards, away from the knee. This initially opens up the ankle joint and allows the foot to pop back into place fairly easily.
Notice that the patient moaned during the procedure. That is because it is painful, but only mildly so, due to the morphine and sedation. Note that if the patient doesn’t call out, then we have given too much sedation. The only way to prevent the patient reacting at all during manipulation is to give a general anaesthetic!
Checks the foot pulse and capillary refill after the manipulation. This is very important.
They plaster the foot (we use a vac splint) with the foot in the anatomical position and with the foot at about 90 degrees to the lower leg.
How to reduce a dislocated patella
The patella almost always moves to the outside of the knee and is clearly visible.
In most cases, it relocates easily with a push from us.
Although not clearly shown in this video, it’s easier to relocate the patella if:
Explain to the casualty what is wrong and what you need to do
Give good analgesia before you start (Entonox or Penthrox for 3-5 minutes before starting)
Warn the casualty that it will hurt briefly
Notice how the doc holds the patella in place until the splint has been applied
After performing the manoeuvre, splint the leg straight.
If the patella has dislocated in the past, the casualty might sort it themselves. But if not, you may well find that the patella pops back on its own simply by straightening the leg. You can see that in this short video clip (ignore the commentary).
Because no one is pushing the patella, you can see clearly how it pops back.
Splinting and Support
Splinting is used to support the limb, maintain alignment, and prevent movement and further injury. You should aim to support the limb over as much of its surface area as possible in order to avoid pressure points.
Typically vacuum splints are used for arms and lower leg injuries, and slings are used for shoulder and arm injuries. Vacuum splints can be used to support or immobilise limbs (arms and legs). Before splinting, consider
which size of splint is most suitable for the injury site
how the splint will immobilise the joint above or below
whether it is big enough
whether you can get access to apply the splint
will it allow you to reassess the limb regularly
A sling or fracture straps can be used to hold an arm or shoulder injury in a comfortable position or to tie the legs together.
How To Apply Vacuum Splints
First unfold the splint and open the valve by pulling it out.
Lay the splint flat and spread the beads out.
Attach the pump and test the splint deflates correctly (this makes the splint become hard).
Expose the skin all the way round and at least 10 cm above and below the fracture site.
Move the splint into position.
Open the valve, let the splint re-inflate then attach the pump again.
Mould the splint around the fracture site, try to support as much of the area around the fracture site as possible then deflate.
Be careful not to position the valve over the fracture site as closing the valve can require some force.
Once deflated close the valve by pushing it in, then disconnect the pump. The splint should now be rigid and providing good support to the limb.
Wrap fracture straps around the splint to help hold it closed.
Ask the casualty to let you know if the there is any change in the support the splint is providing (would indicate loss of vaccum).
Check that the splint remains rigid during the carry-off.
See video below for application of our vacuum splints:
How To Apply A Vacuum Splint
Major fractures - femur and pelvis
Major fractures are those associated with significant damage and bleeding, and have a higher risk of mortality or morbidity. Limb survival may also be at risk in fractures affecting the bones in the legs and arms.
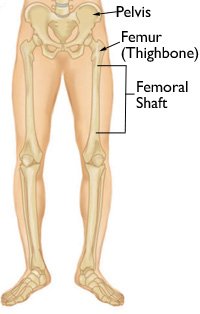
The important fractures are mid-shaft femur, pelvis and tibia. The first two are shown in the figure on the right. The tibia is the big bone in the leg below the knee.
Although a single fracture may not be a life threat, multiple simultaneous long bone fractures definitely will be. An additional concern is if the fracture is ‘open’ (see above).
The femur
The femur, also known as the thigh bone, is the only bone in the thigh. All of the body’s weight is supported by the femurs during running, jumping, walking, and standing. These activities create extreme forces. As a result the femur is the longest, heaviest and strongest bone in the human body. Because of its strength, it takes a lot of force to break a femur unless there is something inherently wrong with the bone. Older people, with weaker bones e.g. osteoporosis (thinning of the bone), are particularly vulnerable to a fracture at the top end of the femur (called the neck of the femur). This can arise from fairly innocuous movements, such as a fall from standing. In younger people, high energy impacts e.g. car crash (including pedestrians hit by cars) and motorcycle accidents are usual causes of femur fractures. In MR, high energy impacts such as falls from a great height or cycling accidents are more likely causes.
The large forces required to fracture a femur and mechanisms of injury involved mean that they often occur with other injuries such as head and spinal injuries.
Anatomy of the femur
The femur can be split into three regions:
Upper part that connects the leg to the pelvis
Shaft (which includes almost all of the long, straight part in the middle)
Lower extremity which forms the upper part of the knee joint

Upper parts of the femur
Head which fits into the pelvis to form the hip joint (see below)
Neck joins the head to the rest of the bone
Trochanters. There are two, but the one we need to know about in MR is the greater trochanter, because that is the level at which the SAM Pelvic Binder is applied (see below).

This type of joint is called a ball and socket joint.
Hip joint
The hip joint is made up of the head of the femur, which fits snuggly into a socket in the pelvis (see figure right).
The shaft and lower end of the femur
The shaft, which is the bit that runs down the thigh
The bits at the bottom (called epicondyles in the figure above right) form the upper part of the knee joint. Fractures in this area are treated as knee injuries and managed accordingly.
Fractured shaft of the femur
Fractures involving the shaft of the femur are especially concerning. The femur has a significant blood flow and is surrounded by large blood vessels and muscles. There is therefore the potential for significant tissue damage and bleeding to occur. The thigh can conceal a large volume of blood.
History
The mechanisms of injury associated with femur fractures are high energy falls or impacts such as:
Falls from height
A climber taking a swing into the crag
Cycle or motorcycle crashes
Horse riding accidents, especially if the horse falls on top of the rider
Signs And Symptoms
With a mid-shaft femur fracture, the contraction of muscles can not only pull the fracture out of alignment, but also pull the ends of the fracture past each other giving rise to a distinctive shortening and bulging of the thigh, sometimes with outward rotation of the foot. The sharp ends of the fractured bones can damage adjacent tissues, and penetrate the skin, giving rise to an open fracture.

Look for:
shortening of the leg (compared to the other leg)
angulation of the leg
a bulging thigh
outward rotation of the foot
whether the fracture is open or closed
The x-ray on the right shows a fractured shaft of femur. It’s easy to see how the features above arise:
The fractured ends overlap each other leading to shortening of the thigh
The bony alignment is lost so the thigh will bulge where the two ends overlap. There may also be angulation.
The leg sometimes rotates out because the muscles have lost their fixed anchor point.
The fractured ends have sharp points which causes damage particularly to adjacent muscles.
The top fragment is resting on the skin. It’s easy to see how this could poke through, leading to an open fracture.
Ask about
pain (including on moving the limb)
the ability to weight bare
distal Motor, Circulation & Sensation (MCS)
crepitus (crunching of the ends of the bones)
whether they felt or heard a snap at the time of the incident
Management using recent (2025) research findings
Fractured femur doesn’t lead to significant bleeding as much as previously thought
Only open femoral shaft fractures have 8% serious bleeding
It is difficult to accurately diagnose the precise site of the fracture on the hill
Vacuum splints are as good as traction in practice
Therefore, changes to our practice now include:
Use traction splint (LAMRT use the Kendrick Splint ) for isolated femoral shaft fractures, esp. open ones
If in any doubt as to site of fracture, or concomitant pelvic or distal limb/ankle/foot fractures - use vacuum splint
Continue appropriate analgesics and antibiotics
Kendrick Traction Splint.
Practical Tip - reducing a fractured shaft of femur has an elastic quality similar to pulling on a door closed. If you try to apply a lot of force to it quickly, it will pull back and be hard to move, but if you apply sustained gradual pull, it will move as the muscles relax and become accustomed to the force. Therefore reduction may need to be done gradually, increasing the pull over time as the leg relaxes until it is back in it's normal alignment (equal in length with the uninjured leg).
Repeat distal MCS checks after applying the splint.
Strong analgesia will be required.
If possible you should avoid log rolling casualties with suspected femoral fractures. Instead use the lift and slide technique.
Watch for trends. Consider the risk of and monitor closely for the development of shock.
Any casualty a fractured femur injury should be considered time critical and evacuated accordingly.
Fractured neck of femur
A fractured neck of femur mainly occurs in the older age group. The usual fracture location is shown in the figure below and it typically follows a fall.

Fractures around the top end of the femur are called hip fractures or fractured neck of femur. The reason for the latter term is that in this type of fracture, the weakest part of the femur is the neck (see figure above) and that is where the fracture tends to occur.
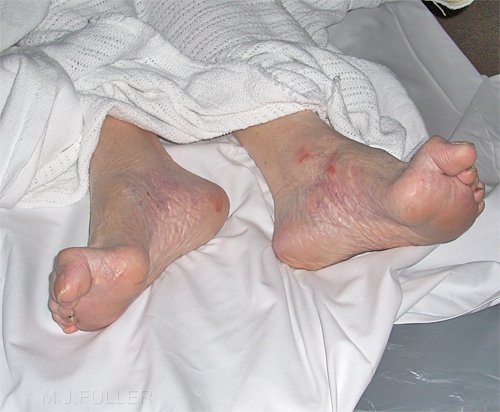
The symptoms include groin pain (but not always) and inability to weight bear or move the leg. On examination, the leg is often rotated outwards (see photo below). The fracture is affecting the right hip.

If you’re pretty sure it’s a neck of femur, the simplest technique for immobilising the leg is to pad between the knees and apply a figure of 8 bandage to the ankles to keep the legs together and to strap the thighs together using a fracture strap. Thus, the the injured leg is secured to the healthy one. Two broad bandages or fracture straps above and two below the knees will help keep everything in a nice position (see right). The figure-of-eight bandage helps stabilize the leg, reduce pain, and prevent further injury.
It can sometimes be difficult to differentiate between a fractured neck of femur (hip fracture) and fractured shaft. We don’t routinely splint a fractured neck of femur. But it isn’t wrong if a Kendrick traction splint is used in this injury, as it won’t cause any harm and will improve patient comfort (Orthopaedic Surgeon’s advice - see Case Care book). If in doubt, use a Kendrick splint. You will do no harm.
Fractured pelvis
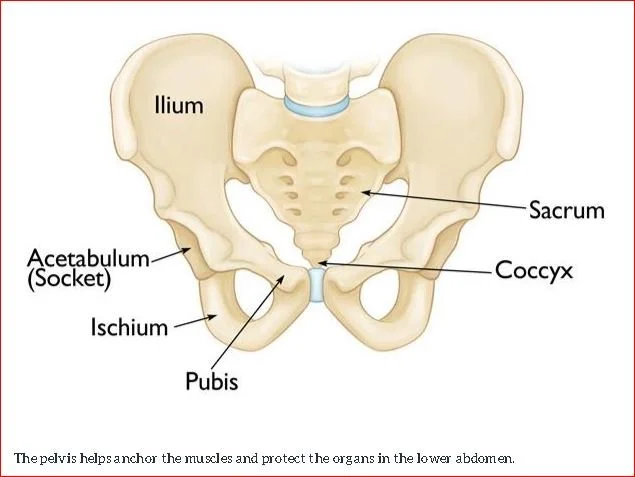
The pelvis is a ring of fused bones that protects the delicate organs of the pelvic cavity and a matrix of blood vessels while anchoring the powerful muscles of the hip, thigh, and abdomen.
Several bones unite to form the pelvis, including the sacrum, tail bone (coccyx), and the left and right hip bones.
The pelvic bones, organs and blood vessels which are contained within or run through the pelvic cavity receive substantial blood flow. Therefore injuries can be associated with significant bleeding. Open pelvic fractures are very rare, but the pelvic cavity provides a large volume into which blood can be lost (0.5-3 litres). The potential for large amounts of hidden blood loss means pelvic fractures, especially unstable ones are extremely serious and can have an associated mortality rate of between 6.4%-30% depending upon the specific type of pelvic fracture.
In general, pelvic fractures are most common in the 15-30 age range. Under the age of 35, men are more commonly affected, while over 35, women are more commonly affected. It can also occur following a fall in the elderly who have osteoporosis. The pelvis is a substantial bone so serious fractures only occur with high energy injuries. In mountain rescue, serious pelvic injuries are rare, but could occur e.g. following a high speed cycling or motorcycling accident, falls from significant height, and possibly horse riding. Because of the energy required, pelvic fractures are likely to occur as part of polytrauma along with other injuries, especially chest, abdomen and spinal injuries. Consider the possibility of a pelvic fracture in any polytrauma casualty.

One specific kind of pelvic fracture that is particularly serious is called the 'open book' fracture. This results from a heavy impact to the groin (pubis) and is most commonly seen in motorcycling accidents. In this injury, the left and right halves of the pelvis separate at the front making it look like opening a book. Fortunately, this is rare in MR.
The majority of pelvic fractures in MR are relatively minor fractures. The pelvis remains structurally stable and there is little bleeding or adverse effects on pulse and blood pressure. It is impossible to tell on the hill how much damage has occured, so it is important to manage all casualties with an appropriate mechanism as if they have a high risk fracture.
History and diagnosis
The diagnosis should really be considered based only upon the mechanism of injury.
No force should be used to test if the pelvis is fractured. This could cause further bleeding. At most, it is permissible to press on the the ilium (see diagram above) on both sides to see if this elicits pain, but this can only be used in casualties with a normal conscious level and no distracting injury. Better is to ask the casualty about the presence of pain in the pelvic area, including the lower back, groin and hips. Any pain on minor movement of the legs indicates a possible pelvis injury. Any positive reply should call for routine immobilisation of the pelvis.
In the case of the unresponsive trauma patient, the pelvis should not be palpated for tenderness or instability. A pelvic fracture should be assumed to be present on the basis of the mechanism of injury and routinely immobilised as described below.
Common mechanisms of injury associated with pelvic fractures are high energy events:
Falls from height
A climber taking a swing into the crag
Cycle or motorcycle crashes
Horse riding accidents, especially if the horse falls on the rider
Pedestrian hit by a vehicle
Suggestive features
Alerting features suggestive of significant pelvic injury during examination include deformity, bruising or swelling over the bony prominences, pubis, perineum or scrotum. Leg‐length discrepancy or rotational deformity of a lower limb (without fracture in that extremity) may be evident. Wounds over the pelvis or bleeding from the patient's rectum, vagina or urethra may indicate an open pelvic fracture.
Management
Try to minimise contact with and movement of the pelvis to preserve clots and avoid further damage. If possible, avoid log rolling casualties with suspected pelvic fractures. Evidence exists that it can damage unstable fractures, increasing the risk or rate of bleeding and causing complications. Instead use the lift and slide technique.
Reduce and stabilise the pelvis via the application of a pelvic binder as soon as possible. If practicable, apply the splint directly to the skin or over underwear.
How to apply the SAM pelvic binder:
The placement of the SAM Sling is critical - see figures on the right.
Immobilise in a vacuum mattress to further limit movement.
Practical tip - in order to minimise the number of times the casualty has to be moved. The pelvic binder can applied at the same time as moving them onto the vacuum mattress. Once the mattress has been deflated ready for insertion under the lifted casualty, place the pelvic binder on the mattress at approximately the level of the hips. Once the casualty has been lowered back down onto the mattress adjust to ensure the binder is in line with the greater trochanters, then tighten and secure.
Repeat distal MCS checks after applying the splint and after moving the casualty.
Strong analgesia will be required because compressing a fractured pelvis with the SAM sling is very painful.
Watch for trends. Consider the risk of and monitor closely for the development of shock.
Any casualty with a mechanism of injury suggestive of pelvic injury should be considered time critical and evacuated accordingly.

The SAM Pelvic Sling must be applied at the level of the Greater trochanters on both side. It will be ineffective if applied above or below this level and it may increase intra-abdominal trauma.

SUMMARY
For fractures and dislocations assess history, functions of MCS, expose fully, look for complications
Use splinting for pain relief; consider reducing fracture/dislocation if concerning features
Use vacuum splinting for femoral fractures unless (esp. open) shaft