Knots and Knot Selection
Knots use the friction properties of the rope to create loops to which equipment can be attached, join ropes together or grip sliding ropes. The thickness, flexibility and surface finish of the rope, together with environmental factors like heat, water, ice and dirt, will influence how tightly the knot grips, the knot’s slippage and how easily the knot can be undone after loading. All knots reduce the strength of the rope to some extent. Knots which use a small amount of rope wrapped in tight angles e.g. bowlines tend to reduce rope strength by more than larger knots like the figure-of-eight.
All knots slip to some extent and this is a useful property that allows them to absorb shock loads and helps to reduce load transmission to the anchors or the casualty. This is one reason that all knots must be removed at the end of a session and new knots tied during the next session.
Knot slippage and rope stretch under load must be taken into account when setting up belays and MPD focal points. For example, a belay using 10m of rope with a clove hitch at one end and a ‘big knot’ at the other is likely to move according to the following equation:
Rope Stretch + Clove Hitch Slip + Big Knot Slip = Focal Point Movement
Using the table below this gives:
(10 x 3%) + 0.03 + 0.04 = 0.37m
All knots must be neatly dressed and pulled handtight (set) prior to adding a stopper knot, which must be positioned as close as possible up against the back of the main knot. The tail remaining after the stopper knot must be at least 10X the rope diameter.
Rescuers should regularly practice tying the knots listed in the table below.
Ropes are vulnerable to damage from sharp edges and rough surfaces. This is particularly true of knots, which can wear rapidly if they are in contact with the rock. If possible, knots should be kept in mid-air away from the ground. If this is not possible, they must be protected – ideally with a rigid edge guard.
Knot Selection, Strength Reduction and Knot Extension
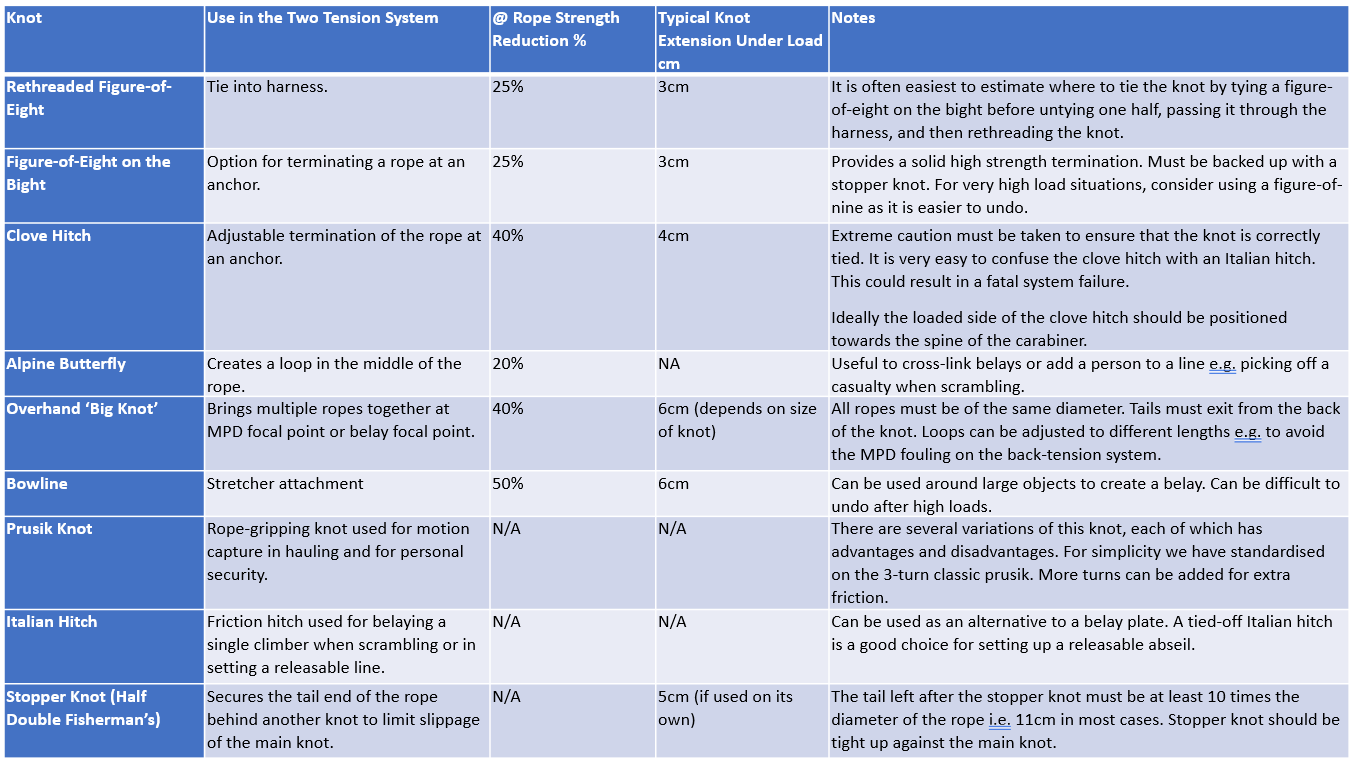
Knot Selection Table
Special Knots Not Routinely Used

Training Syllabus and Sign Off
LAMRT members are required to maintain a minimum standard of proficiency in rope rescue and have the option of obtaining additional more advanced qualifications.
Competency is assessed by authorised team members and recorded on the individual team members Rope Rescue Skills Log. The competency requirements include the ability to tie and inspect the knots listed below.


Rethreaded Figure-of-Eight


Figure-of-Eight on a Bight

Dress the knot by pulling all four strands and tie a stopper knot tight against the main knot

Clove Hitch
Make two identical loops


Alpine Butterfly (sometimes just referred to as an Alpine)


Three Wrap Prusik Knot
Start by moving the sewn joint so that it is positioned away from the knot and the clip in point

Bring the prusik up around the rope and back through itself

Repeat this until you have 3 wraps

Dress the knot so that all of the strands are neatly snugged up against the rope. Clip in to the loop, tighten and test that the prusik grips effectively.

Once it has been loaded it may be difficult to release the prusik. Twisting the knot and feeding in slack from the loop should release it.
Italian Hitch (Also called Munter Hitch)


Bowline
Pass the rope around the anchor and make a loop on the loaded side of the rope.

Pass the tail end of the rope up through the loop and around the back of the loaded rope

Pass the tail end back down through the loop. Note that the tail finishes up on the inside closest to the anchor.

Finish by dressing the knot and tying a stopper knot tight against the main knot
