Prior to Leaving Base
Obtain as much information as possible including:
· Crag location and route name? (Double check e.g. which Raven Crag?) SARLOC and guidebooks in base to help confirm.
· Type of injuries?
· Number of casualties?
· Is casualty on the crag or on the ground?
· Weather forecast?
· Potential Avalanche risk?
· Any water hazards?
If applicable take:
· 200m ropes from the Equipment Room (e.g. Pavey Ark, Gimmer Crag, White Ghyll)
· Avalanche Transceivers and Winter kit
· SRT equipment and SRT qualified team members (Additional SRT and Rope Technicians available from LDSAMRA)
Prior to Leaving the Vehicle
· Give a short briefing. Prioritise equipment which is required first and send with the fastest people
· Ensure all team members fit and BUDDY CHECK the required PPE
· Ensure enough PPE is available for the casualty
Initial Approach & Evaluation
· Confirm location? All top down rescues require Spotters. Deploy these early
· If not already done fit and BUDDY CHECK PPE
· Perform continuous dynamic risk assessment
· Establish and maintain voice or visual contact with the casualty
· Establish situation, discuss, plan and communicate. Establish roles based on the type of set up.
Determine:
· Minimum number of team members required?
· Minimum expertise required?
· Equipment required?
· Helicopter?
· Determine if you will be hauling up or lower down?
· Dispatch medical team to top or bottom as required?

Location & Set Up
· Make area safe establish zones of operation. Hot Zone, Equipment Dump, Bystanders
· Rescue Lead appoints tasks (Blue and Red focal points, teams etc)
· Establish fall line
· Place MPDs
Anchor Selection
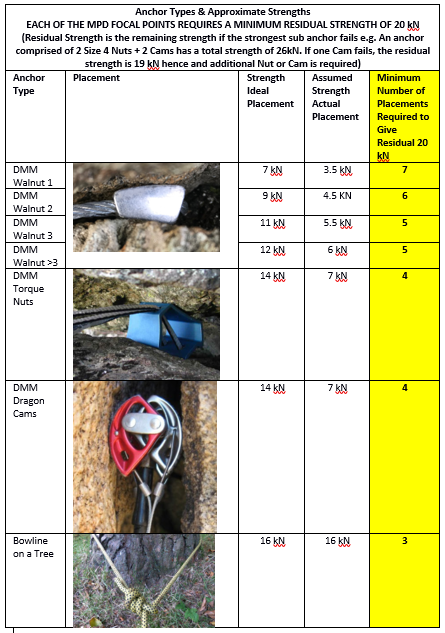
· At least four main anchor points with a minimum of strength of 20kN each such that if one main anchor fails e.g. rope is cut each MPD focal point retains a residual strength of 20 kN.
· Even spread behind the two MPD master points
· Avoid load multiplication. Ideally maintain angles of less than 90 degrees between belay legs and between any sub anchors within the system
· Several smaller anchors may need to be placed to establish each main anchor
· Add slings to equalise main belay rope legs
· Avoid knotting slings (50% strength reduction) however this maybe required to equalize groups nut placements. (See the Forces & Load management section of the web site)
Set Up
Deploy 2 X black belay ropes as follows to create two MPD Master Points:

1. Tie a figure-of-eight on the bight and place it at the edge of the crag.
2. Run the rope to the MPD location, create a loop for use when tying focal point knot, and then run the rope on to the first main anchor and tie a clove hitch
3. Run the rope to the second anchor, leave plenty of slack to allow for adjustment. Tie a clove hitch at the second main anchor. and run a single rope back to the MPD focal point (Repeat as required for additional anchors)
4. Tie an alpine butterfly close to the point where the rope will enter the focal point. This will form the cross link between the two systems.
5. Gather all the rope strands together and tie one large overhand knot, ensuring that all strands of the rope exit from the back of the knot.
6. Adjust the overhand knot such that the loops at the front of the knot are different in length. One or more loops will be used for the MPD and one or more for the back-tension system.
7. Once completed, link the alpine butterfly knots in each of the central belay ropes to cross-link both systems.
8. Finally, adjust the clove hitches to give equal tension in all belay legs.

Back Tensioning
· Purpose is to pretension the belay to prevent excessive movement of the focal points, stretcher and Attendant during the edge transition and initial loading of the system
· Back tensioning is essential for sharp transitions and beneficial but not essential for more gradual smooth transitions
· Establish a centrally located anchor in front of the MPDs
· Using the 8mm cord construct a simple 3:1 pulley system and use this to equally back tension both systems. This can be achieved via a single back tension system equalised using a sling or by building two back tension systems and applying similar force to both systems
Loading the MPDs
· Tie safety knots in the standing ends of both main lines
· Load red and blue main lines. (See online Rope Rescue Equipment Guide)
· Attendant requires at least two points of attachment. Normally a direct tie in to both the red and blue ropes using a rethreaded figure-of-eight knot. If a stretcher is being used and the casualty on the stretcher has a harness the tails of one or both ropes may also be tied into the casualty.
· Edge and Vector tie in using rethreaded figure-of-eight knots and clip in using the red prusiks. This is for travel restraint to prevent them going over the edge during the rescue.
· Place edge protection as required.

Stretcher Attachment
· Assemble and inspect stretcher
· Fit wire helicopter strop provided using the screw gate carabiners (Due to Coast Guard requirement this does not use self-locking carabiners) provided. Red cables go to the head end and blue cables to the foot end.
· There have been several instances of the gates on these carabiners coming unscrewed during rescues. To minimise this risk, the carabiners must be fixed with the gates facing inwards. Check gates frequently during the rescue
· Attach red and blue main lines to the rings of the helicopter strop using interlocking bowlines with long tails
· The Attendant should then tie into the ends of the tails. It is essential that the Attendant and anyone else going close to or over the edge has at least two points of attachment. The minimum being a Figure of Eight tied in to the harness and a Prusik clipped to the harness
· The Attendant may also use a Purcell prusik or adjustable lanyard to adjust their position during the rescue
· If the casualty is wearing a harness, they can also be clipped into the tails or attached using a Purcell prusik. (The stretcher strapping system is rated for rescue use, therefore it is not essential for the casualty to be tied directly to the ropes.)
System Operation
Final Preparation for Lowering
· Depending on the location, other members of the team, e.g. MPD or Tails operators, may also need to clip into either the main belay system using personal prusiks or slings or into a separate belay system provided for this purpose

· System must be inspected by at least two competent persons, and buddy checks must be repeated. Preferably, the inspection will be undertaken by someone with fresh eyes, i.e. someone who wasn’t involved in setting up that part of the system
· MPD Operators must check that they have the pulleys and prusiks available to switch to hauling mode if required
· The Controller gathers the team together and briefs everyone on the rescue plan, the calls to be used, and any contingency plans in the event of problems. If possible, the casualty should also be informed of the plan and what is about to happen. From this point on, all instructions except Stop must be given via the Controller. Persons not directly involved in the operation of the system should move away to a safe area
· A team member will be allocated to maintain radio contact with the base using the standard channel
· The lowering team, the Attendant, the Spotter and the Controller should switch their radios to point-to-point communication (DG1)
· Once all the team have confirmed that they are ready, the Controller will perform one or more short practice lowers. If all goes well with the practice, the lowering process can now proceed
Edge Transition & Vectoring
The first part of the lowering process is often the most awkward and potentially dangerous step. The Edge and Vector roles are:
· Facilitate the edge transition and the protection of the ropes from any sharp edges. The Edge and Vector may also assist the Attendant in route finding
· Transition is managed by lifting the ropes and stretcher to waist height and then gradually lowering them onto the edge of the crag as the Attendant moves from the level ground on to the vertical face
· To complete the edge transition without any shock loading of the system. There is a potential for snagging and entrapment, and the team must be ready to stop lowering or to recover the stretcher and Attendant if required
Once established on the face of the crag, it is useful to stop and allow the Attendant to plan the descent and identify any previously unseen hazards. Loose rock is a persistent threat and the Attendant must be ready to deal with this either by manual removal or if necessary abandoning the lower and being recovered to the top of the crag. (There is always another route to any rescue, and rock falls are major hazard)

Resuming Lowering After Loading Casualty
If, as is normally the case, the stretcher has landed on a ledge before the casualty is loaded, then it will be necessary to switch the system from lowering to hauling mode and lift the stretcher prior to moving back into lowering mode. This allows the stretcher to be easily moved by the Attendant and eliminates any risk of shock load when departing from the ledge
Hauling
Most rescues will be conducted from top to bottom with the casualty then being evacuated from the base of the crag. In some cases, however, it may be required to pre-tension the system, e.g. when picking the stretcher up from a ledge prior to resuming a lower or recovering the casualty to the top of the crag
To transition from lowering mode to hauling mode, the following protocol must be followed:
1. Stop lowering and lock the MPDs using the parking brake function
2. Place a three-turn prusik on each of the lowering ropes
3. Take the lowering ropes off the friction horns of the MPDs
4. Pass each of the lowering ropes through a single or double pulley which is then clipped to the prusik
5. Slide the prusiks as close to the edge as safely possible
6. Unlock the MPDs and haul on the standing parts of both ropes
7. Just before the first of the pulleys reach the MPD, stop hauling and have the Edge reset the prusiks back to the edge of the crag

Normally a 3:1 mechanical advantage will be enough. However, if a 5:1 system is required, a double pulley should be fixed to the prusik and a single pulley clipped through the hole in the bottom of each MPD
In both cases, the rope must be hauled backwards away from the edge of the crag. It is preferable to walk away from the crag pulling the rope rather than hauling it hand over hand
To switch back from hauling to lowering:
1. Stop hauling and lock the MPDs using the parking brake
2. Remove the prusiks and pulleys
3. Place the lowering ropes over the friction horns on the MPDs
4. Unlock the MPDs and resume lowering

Set Up and Use of a Guideline
In some instances, it is necessary to move the stretcher horizontally to avoid a hazard. This can be achieved by use of a guideline
One of the lowering ropes is extended and tensioned from below to guide the stretcher over rocks or hazards encountered during a regular top-to-bottom lowering operation. Tension is controlled from the bottom and lowering rate is controlled from the top. The load is effectively only supported by one rope hence the stretcher must only traversing a few feet above the ground
Set Up for Crossing Rocks & Scree

The above photograph shows a guideline used for the low-level crossing of 100m of rough ground following a vertical lower. In this example, the red lowering rope has been extended and repurposed to become the tensioned guideline, and the blue rope is being used to control the rate of descent. A 5:1 pulley system has been installed at the bottom, which is being used to tension the line red rope
Pick-Off Rescue
· Pick-off rescue is suitable for an uninjured climber or a casualty with discrete injuries that do not require full immobilisation
· Pick-off may also be the only option in some locations or due to an urgent overriding medical condition that can’t be addressed at the current location, e.g. an unresponsive casualty in suspension
· Method of attachment is to tie an alpine butterfly in both the red and blue ropes such that the loops of the knot hang about 50 cm above the Attendant’s tie-in point. The belay loop of the casualty’s harness can then be clipped into both loops using two self-locking carabiners
· Alternatively, prusik loops can be attached to both working ropes and once again clipped to the casualty’s belay loop
· If the casualty is unconscious, they will require some form of chest support to prevent them from flipping upside-down. This can be achieved using a full body harness
NOTE
· If the casualty is still attached to their climbing rope and hanging in suspension they will require hauling up to untie them. (Under no account should ropes be cut)
· During a pick-off rescue, the additional weight of the casualty may cause sudden extension or shock-loading on the system. To prevent this, it is best to have the team haul the ropes such that the initial take-off is upward under full tension
· It is also important that the rescuer remains directly below the belay i.e. in plumb line to avoid the potential for a swinging fall
· Also note that if the rescue involves more than one climber, the other climber may be hanging in counterbalance, i.e. the leader’s fall has pulled the second off his belay. In this situation, both climbers need to be belayed before either is removed from the system
De-rigging
· De-rigging must only commence on the clear instruction of the Controller and after it has been double-checked that all personnel are disconnected from the belay system and are in a safe location. Generally, de-rig from the crag back towards the anchors
Roles & Calls Crib Sheet
Setup Briefing
PPE Buddy Check – Helmet, harness, gloves, glasses/goggles, safety lines
Operational Area – Safe working area, fall line, maximum extent of anchors
Assign Roles – Edge and initial access, stretcher and working lines, rigging left, rigging right
Place MPDs at focal point
Observe and Co-ordinate Setup
Live Briefing
Going Operational – Setup is complete and fresh eyes safety checked
All Quiet On Set – Conversation kept to a minimum
Assign Roles – Attendant(s), Edge, Vector, MPD Blue, MPD Red, Tails, personnel without a role to leave the operational area
PPE Buddy Check – Helmets, harness, gloves, glasses/goggles, safety line
Commands In Use – All commands except Stop go through Control, call and repeat reminder, read out commands, everyone understand?
Sequences – Read out the sequences so everyone understands,
Role Call – Tails ready? MPD Blue ready? MPD Red ready? Vector ready? Edge ready? Attendant(s) ready?
Dry Run(s) – Practice edge transition sequence as many times as necessary
Go live – Move the stretcher to the edge, undertake the operation
Call and Repeat
All commands and sequences except Stop are repeated before being actioned
Commands
Stop – All stop, MPD operators release the handle, otherwise remain ready
Down on Both – MPDs let rope out
Speed Good – Continue at current speed
Slow Slow – Reduce speed
Down Down – Increase speed during a lower or guiding line
Up Up – Increase speed during a raise
Haul on Both – Haul in on both lines
Reset – Stop hauling and reset pulleys
Set – Ready to haul again
Attendant(s) Lean Back – Straighten legs, pull the stretcher out over the edge
Vector Up – Lift the lines to shoulder height
Vector Down – Lower the lines placing them on edge protection
Sequences
Lowering Edge Transition – Attendant(s) grip the stretcher, Attendant(s) lean back, vector up, down on both, set edge protection, vector down
Ledge Departure – Attendant(s) grip the stretcher, haul on both, stop, remove pulleys, lowering positions, attendant(s)lean back, down on both
Pulley Reset – Stop, reset, set, haul on both
Raising Edge Transition – Stop, reset, set, Attendant(s) grip the stretcher, Attendant(s) lean back, haul on both, vector up, move away from the edge, stop
Derigging – Stop, untie, stretcher, clear below, recover working lines, remove MPDs, edge, back tension, safety check, rigging anchors and rigging lines